Top 10 exciting new features in SQL Server Management Studio 2016


[This article was originally posted in CodeProject]

Introduction

This article is an effort to list out few exciting improvements those has been made to SQL Server Management Studio 2016. I believe, most of these new features can help improve the speed of our work and more convenient to use the SSMS.

1. Color Theme

With SSMS 2016, now you can choose your preferred color theme, a feature similar to that in Visual Studio. For now, you can choose one from 2 available color themes – Blue or Light, Blue being the default theme.

Tools - Options - Environment - General - Color theme

2. Hide Save Query Window Prompt

In earlier versions of SSMS, you can’t ignore the save query windows prompt that comes when you want to close either an unsaved query window or the SSMS itself. While this restriction is actually meaningful to have in SSMS but with SSMS 2016, you can now customize to hide those prompts as per your preference.

Tools - Options - Query Execution - SQL Server - General - “Prompt to save unsaved T-SQL query windows on close”

3. Update from SSMS Menu

SSMS 2016 automatically checks for any updates available when it is online and a toast notification comes when there is an update available something as following screenshot-

However, you can also check manually for updates availability.

Tools - “Check for Updates…”

You can disable automatic checking for updates by unchecking the checkbox in the popup window that appears when you click “Check for Updates…” as described above.

4. Search Options

Confused with so many new features and steps to open the window to configure them? Don’t worry, SSMS now has the Search Options which is one of much requested feature. You can search with the feature name or a keyword.

Tools - Options

5. Highlight Current Line

How many of the times you feel lost while modifying an existing huge query or stored procedure in SSMS? The problem occurs when your SQL statements are very long and you haven’t configured text editor to wrap words automatically and then when you use the horizontal scrollbar to scroll the content, it becomes difficult to identify which the line you wanted to modify or check. Now, with SSMS 2016, an outline will follow your cursor where ever you placed it. That makes easy to identify the line you are currently working with. The best part is, it can be configured.

Tools - Options - Text Editor - General - “Highlight current line”

6. Scroll & Zoom Execution Plan Window

There are also few improvements done on the Execution Plan window. Now you can zoom the content of this window using shortcut CTRL + Scroll. You can also scroll the content of the window by dragging the content with mouse.

7. Retain Carriage Return and Line Feeds on Copy or Save

It may seem to you as a weird default behavior. In SSMS 2016, if you copy any result from the Result Grid and paste it in a notepad or any text editor, you will notice that the carriage return and line feeds are not in place. However, this can also be configured.

Tools - Options - Query Results - SQL Server - Results to Grid - "Retain CR/LF on copy or save"

Example:

Executed following query by unchecking the checckbox.

SELECT 'This is a demo text
for test purpose only' AS demotext

The output while copying to notepad was as follows-

demotext
-------------------
This is a demo text  for test purpose only

Now, executed the same query after checking the mentioned checkbox and got result as –

demotext
------------------
This is a demo text
for test purpose only


8. Advanced Scroll Bar

If you have used Visual Studio, then probably you are already aware of such feature. With SSMS 2016, you can use “bar mode” or “map mode” for the vertical scroll bar in the query window.

  • Bar Mode : This is the default and normal vertical scroll bar same as you can see in the previous versions.
  • Map Mode: This is new and source overview can be viewed on the scroll bar which can again be configured as –
    • Off : Source Overview will not be visible
    • Narrow: Overview with minimum width
    • Medium: Wider than previous
    • Wide: Widest scrollbar with overview

You can also configure to show Tooltip on hover or scroll using checkbox “Show Preview Tooltip”

Tools - Options - Text Editor - All languages - Scroll Bars - Behavior

You can also open the configuration window by right clicking on the vertical scroll bar and then clicking "Scroll Bar Options..."

To know rest of the features , please visit my original article on CodeProject

Thanks for reading. Awaiting your feedback 🙂

MS Excel: Copy as formatted table


In this quick tips, we’ll check how can we paste a specific portion of the excel sheet as formatted table, in particular to email. Microsoft Excel is a widely used tool for spreadsheet and used for storing useful data meant for calculation, chart etc.

Now, sometimes you may need to copy a particular portion of the excel sheet to the email so that the receivers can view it in tabular form and get the intended message. If you select a portion from the excel sheet and paste as it is in the composer window of email, it will not serve the desired purpose. So, in this small tip, we’ll try explore those possibilities via which we can keep the tabular format intact while paste a portion from an excel sheet to your email compose window.

Before we deep dive into the possibilities, let’s quickly have a view of how it looks when we directly copy a portion of an excel sheet to email ( gmail in example but follows the same rule for other email service providers too) –

1

Image 1 is screenshot of what I have created in the excel sheet while image 2 shows the email window and how it looks when we paste the copied portion from that excel sheet. It’s clear that we need a better approach to get this particular job done in an efficient way to keep the formatting intact. For that we may follow either of the following  2 options from many.

Option 1:

This is the simplest way possible. You can take a screenshot or make use of any clipping tool to generate an image and paste that in the email. You can even do that right from within the MS Excel sheet. To do that,

  • Select the portion you want to be copied
  • Copy (CTRL + C)
  • Right click on the selected portion
  • Go to “Paste Special…”
  • Click on paste as “Picture”
  • Copy (CTRL + C)

2

3
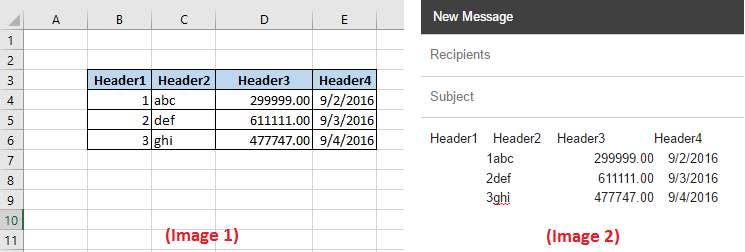
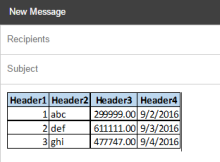
Now, if you paste this on your compose box, you will get a beautiful view and visually same as what you wanted. Something like the image on the right side. Have you noticed the big caret at the end? It’s because it’s just an image and obviously, you will not be able to edit /select any particular text in the table.


Option 2:

The problem with the above option is, it is not search friendly. If you use email regularly for various purposes then you might already have realized the importance of being able to search your old emails based on keywords from the email body. With the first approach it is impossible to search a particular word or text from the table as it is just an image. So you may like this approach than the previous one as it copies the selected portion of the excel sheet as a formatted table. So, you can make use of the search functionalities as per your need.

To do this,

  • Select the required portion from the excel sheet
  • Click on the “Quick Analysis” icon or press CTRL + Q
  • Click on “Tables” tab
  • Click “Table”
  • Do the necessary table formatting
  • Copy (CTRL + C)

4

You’ll get the same result while pasting this on your email compose box but as said, texts within this table will now be included in the search result.

Hopefully, this small tips will be useful to you.
Please drop a comment in case of any queries or suggestions 🙂


SQL Server 2016: Masking sensitive data


Introduction

Data Masking

At the time of writing this article, it’s been more than 2 months since the most secure and powerful SQL Server yet released for public. It has many features which you can use to make your data and application more secure, more maintained and easily retrieved as per your requirements. It has introduced both client side security such as Always Encrypted as well as server side security such as Data masking etc. In this post we’ll examine how Dynamic Data Masking can help secure our data.

Earlier we were masking the sensitive data by applying logic at application end or by replacing characters at SQL Server end and then returning the masked data to the application. In the former case the risk was at
1. When application fails to mask data
2. Sensitive data transferred over network
3. All the users in SQL Server with SELECT permission still can access the unmasked data

In the later case, the first two risks are eliminated but still there is a chance that the sensitive data can be revealed by the SQL Server user through which the application retrieves data.
1. When application fails to mask data
2. Sensitive data transferred over network
3. All the users in SQL Server with SELECT permission still can access the unmasked data

So, let’s quickly jump in to the next section to understand what Dynamic Data masking is and how it helps to eliminate all these chances of unmasked data getting revealed.

Data Masking

If you search for definition of Data Masking over the web, you’ll end up with varied descriptions. The simplest and straight forward definition can be –

“Data masking is the process of hiding original data with random characters or data.”
wikipedia

If we look further, there are various data masking techniques available such as

  • Shuffling: Shuffling order of the characters in the value.
    Ex: 12345 —–> 35312
  • Nulling: Substituting characters in the value with null (hash) symbol.
    Ex: 12345 —–> ###45
  • Substitution: Substituting value with another value from a substitution table.
    Ex: Suvendu Giri —–> John Ptak
  • Masking Out: Masks the complete data or a selective part of the data.
    Ex: suvendu@mydomain.com —–> suvendu@xxxx.xxx
    etc.

Considering many techniques of data masking they can be categorized into 3 types-

  • Static Data Masking: Original data in production changed to masked data.
  • On-the-fly Data masking: Copies data from one source to another source and masking done on the later.
  • Dynamic data masking: Masking done dynamically at runtime.

Dynamic Data Masking

“Dynamic data masking limits sensitive data exposure by masking it to non-privileged users. Dynamic data masking helps prevent unauthorized access to sensitive data by enabling customers to designate how much of the sensitive data to reveal with minimal impact on the application layer. It’s a data protection feature that hides the sensitive data in the result set of a query over designated database fields, while the data in the database is not changed.”
MSDN

So, dynamic data masking alters the result for non-privileged users while streaming and not with data in the production database.

Data Masking in MySQL:

As far I know, till the recent version of MySQL there is no inbuilt mechanism to provide dynamic data masking capabilities. The possible options for MySQL users seems to be

  1. Use 3rd party tools
  2. Use custom scripts/functions

Examples:

SELECT '****' AS PhoneNumber
FROM `Employees`
--Input: 1234567890        Output: ****
SELECT REPEAT('*', CHAR_LENGTH(PhoneNumber) - 6) AS PhoneNumber
FROM `Employees`
--Input: 1234567890                        Output: **********
SELECT CONCAT(SUBSTR(PhoneNumber, 1, 4), REPEAT('*', CHAR_LENGTH(PhoneNumber) - 4)) AS PhoneNumber
FROM `Employees`
--Input: 1234567890                        Output: 1234******

Data Masking in PostgreSQL:

Same as MySQL. It seems they are still lacking this feature. However, we can make use of some custom scripts or user defined functions.

Azure SQL Database too supports the dynamic data masking similar to SQL Server and I have heard from my friends that Oracle provides some kind of mechanism for data masking, although I haven’t ever used it.

Dynamic Data Masking in SQL Server 2016:

There are four masking functions available in SQL Server 2016 to provide separate ways to mask your data when they are returned by a query. These are-

[Read complete article at this link (CodeProject.com) ]

Get your hands on SQL Server 2016 RC3 on Azure


[ Note: This post is for beginners with Microsoft Azure and just about creating the environment. Will cover few exciting features in the next blog posts ]

Expiry date of the post: 1st June 2016
A post, with an expiry date ! Sounds illogical, isn’t it?
Well, it’s true and I will explain this soon.

If you are from database background and have ever used SQL Server or currently working on areas related to data or SQL Server, you must be aware of the trending buzz among the people around you. A more faster, secure and powerful SQL Server, SQL Server 2016 will be available soon. Microsoft continuously surprising people with their moves towards making many development tools like Visual Studio, .Net etc cross-platform, open-source and more feature rich. SQL Server 2016 have few surprises too and with many new features & improvements.

The biggest news this year for database professionals was the announcement to make SQL Server available to run on Linux OS (the expected time for availability is mid of 2017, though). Apart from this, peoples at Microsoft have worked hard to bring many exciting features to SQL Server 2016 in the areas like Security, BI, Data Warehousing, Analytics etc. There are many improvements and new features added to the SQL Server Management Studio too. Microsoft has announced to release SQL Server 2016 on 1st of June 2016, around 13 days more. Once it’s available you can download and checkout the features. As announced earlier, the developer edition will also be free along with Express edition as usual. Now, if you are somebody who can’t wait for another 13 days period (like me 😉 ) then let’s see what are the options available with us. As you might already know, SQL Server 2016 RC3 (Release Candidate) is available for download, you can just download and install it in your machine. But for just 13 days,  the better option is to create a free Azure account with promotional $200 credit and checkout the features without harming to your existing system. Hopefully, I have clarified on the “Expiry Date” note.

The process is very clear and simple.

  1. Open azure.microsoft.com
  2. Following screen should appear
    1
    You can see $200 credit offer which will be valid for 30 days. Click Start now.
  3. You will be redirected to the Azure login page. Provide your existing Microsoft account details or create a new one using Sign up now.
  4. Once you are logged in, either click on Portal or just visit portal.azure.com
  5. You should be presented with something like following screenshot. Right side is your dashboard which you can customize as per your need and the left menu lists out the broad categories of Azure service offered. Click on the Virtual machines.
    2
  6. Click Add.
    3
  7. Find SQL Server in the list and click on it.
    4
  8. As you march forward, you’ll notice that further settings are getting opened as a new panel on the right side. Find SQL Server 2016 RC3 Evaluation on Windows Server 2012 R2 towards the bottom of the list and click on it.
    5.png
  9. Just click on the Create button for now.
    6.png
  10. You need to provide some more details about your virtual machine. Go ahead with filling Basic settings first. Note that I have used Azure Pass as subscription here but you will have the free trial option if you have signed up for free trial, otherwise your existing subscriptions.
    8
  11. At next step, you need to select the size which lists out the hardware details for each of the option. Choose a size from the recommended category only as these are the options which meets the hardware requirement specification that is published by the publisher (Microsoft in our case).
    NOTE: Prices mentioned in these options will be charged from your subscription account. If you are using Azure Pass or Free Trial, you can use those subscriptions to purchase this. For Free Trial, make sure not to agree for paying from your credit card. The subscription days should be truncated as per your balance in the subscription.
    9
  12. Next, you can customize various other settings such as Storage, Network etc. or just click OK to navigate to next step.
    10.png
  13. Then few more settings for your SQL Server instance like whether you want to use it inside VM, Virtual Network or available publicly over internet etc. You can customize according to your need or just click OK.
    11.png
  14. Then it will run a final validation and clicking on OK should start the deployment. You will be redirected the dashboard and you can see the progress there.
    12
  15. Once deployment is completed, you will be notified with a message “Deployment Succeeded”. Just copy the public IP from your virtual machine details and do the RDC (Remote Desktop Connection)
  16. Your VM is now ready with SQL Server 2016 RC3 installed in it. Type “SSMS” in the start screen and pin it to Task Bar or Start Screen and start using it.

That’s all for now. In my next blog posts, I will share some interesting features that are introduced with SQL Server 2016. Stay Tuned !

Thanks for reading 🙂


Things to know before Global Azure Bootcamp


Boot-Print-(1)I am sure the news must have reached to you, after all it’s not the age when one waits for the mails to be handed over to him/her by the gentle-well uniformed-postman. The electronic mails termed as email have killed the time consuming process and won the battle against traditional mails to self declare as the King. All the news are at your finger tip now. All the information, around the globe can be served by Bing Sir and Google Sir. Hah..Life got really easy and getting better, isn’t it? Well, I am not going to take your time by telling you the story which is very known to you. Let’s quietly jump to the next paragraph then. Shhhhhhhhhhhh….Please don’t make noise, I am going to write about something very interesting.

globalazurebootcamplogo2016Well … Well.. Well…Global Azure Bootcamp.Very few days to go. If you are new to Global Azure Bootcamp, check this official link for details. This time, it’s happening across the planet on 16th April 2016. I am very excited to attend yet another chapter of Global Azure Bootcamp.  It’s an event where technical experts, IT Pros, Renowned Speakers, MVPs, MSPs, Developers, Students and people who love technology gather together to share – learn – gossip on cloud computing. A full day deep dive for developing cloud computing apps. It’s one of the largest global community event on the planet. This time, it’s happening in more than 150 locations across the globe.

If you are interested, you can find a location near you Global Azure Bootcamp Locations.

Few information about Global Azure Bootcamp 2016

  1. If you are available over Facebook or Twitter and posting something about Global Azure Bootcamp, you can use official hashtag #GlobalAzure
  2. Connect @Azure on Twitter
  3. Connect Microsoft Azure , Global Azure Bootcamp on Facebook
  4. Check Azure Blog

Want to learn the basics before you participate in Global Azure Bootcamp this year? (if you are new to Azure like me)
..then check following links which may help in this regard..

Video Tutorials:

  1. MVA (Microsoft Virtual Academy)
    Microsoft Azure Fundamentals
    Other Microsoft Azure Courses
  2. Windows Azure Free training videos from Devcurry 

Blogs/Articles:

  1. Sorry. No links this time. Just Bing it or Google it.

Free Books:

  1. Fundamentals of Azure : Microsoft Azure Essentials
  2. Building Cloud Apps with Microsoft Azure
  3. Microsoft Azure Essentials: Azure Machine Learning

Global Azure Bootcamp Bhubaneswar 2016

MSDC Odisha is organizing the event at Bhubaneswar yet another time. I am lucky to be a member of MSDCOdisha team and excited to learn new stuffs this time too. It was a great success last year with a huge no of audience and my favorite speakers Abhisek Sur, Pooja Baraskar, Abhishek Nandy, Sumantro Mukherjee, Nirmal Hota & Tadit Dash. You can find more details about the last year event at bhubaneswar.azurewebsites.net.

This time we have planned it to make more interesting. We have invited very experienced speakers and IT Pros to make it a more learning day for all of us. Hopefully, we would meet at the event.

Few information if you are looking to join us-
1. Register here
2. Location: ITER, SOA University, Bhubaneswar
3. Time: 9:30 AM to 5 PM
4. More information at the event page
Global Azure Bootcamp Bhubaneswar 2016
5. Contact : MSDC Odisha Team


Hopefully, it was worth investing your valuable 10 minutes reading this post. Would like to hear back some sweet or bitter :p words from you. In case you want to know more please feel free to drop me an email at suvendu.giri@live.com

Thanks

Here are some pics of the last year Global Azure Bootcamp at Bhubaneswar

For more photos check this GAB 2015.

Windows 10: Change default File Explorer View


win10
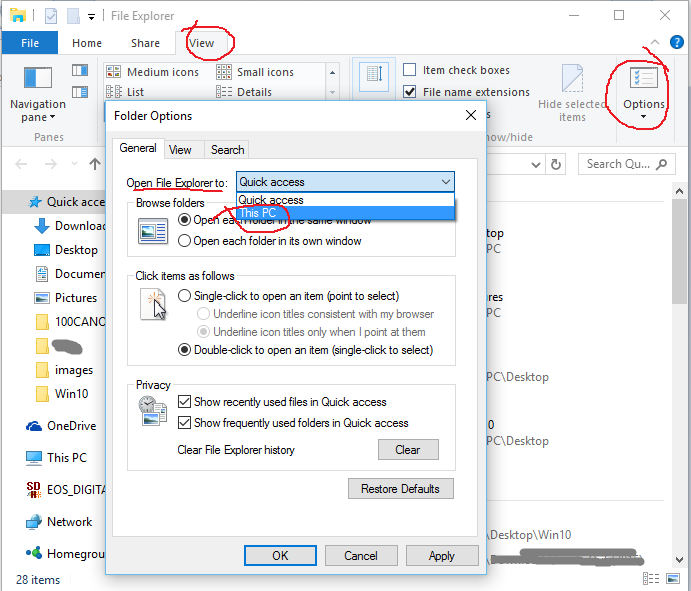
This small tip is for those users of Windows 10 who miss the “This PC” or “My Computer” File Explorer view of previous versions. In Windows 10, it opens the File Explorer with its default view as “Quick Access” view which is introduced in this version of Windows.

It is a very useful feature as you can view your most frequent and recent files and folders grouped under two sections. Check this sample screenshot:

1

I like this feature and will continue to use as such but if you don’t like it and want the File Explorer to be opened as “This PC” view as it was there in the previous versions of Windows then check following steps –

  1. Open File Explorer
  2. Click on View menu
  3. Click on Options in the ribbon below the menu bar. It should open a popup window Folder Options
  4. In the General Tab, change the drop down selection- Open File Explorer to : Quick access to
    Open File Explorer to : This PC
  5. Click Apply
  6. That’s all !

Check following screenshot-

2.png

Hope, you liked this post. Would love to read your thoughts on  this.

Thanks ! 🙂

Tip-3: Exciting SSMS features derived from Visual Studio


In this series of posts, we’ll see few great yet less known and under utilized tips/features those are there since earlier versions of Visual Studio and later made their way to SSMS (SQL Server Management Studio). I am sure, you’ll love these tips.
Tip 3: Transact SQL Code Snippet – Insert Code Snippet


Have you used code snippet feature in Visual Studio? Aren’t they very useful?

What are code snippets?
Code Snippets are reusable code templates those help to write code faster.

What are Transact SQL code snippets?
“A Transact-SQL code snippet is a template containing the basic structure of a Transact-SQL statement or block. You can use snippets as a starting point when adding statements in the Database Engine Query Editor. You can insert the pre-defined snippets supplied with SQL Server, or create your own.”MSDN

We’ll discuss about how we can create a Transact SQL code snippet of our own on a later blog post. For now, we’ll see how we can use them.

You can do it either way-801800

  • Right click on the query window and click Insert Snippet…
  • Using keyboard shortcuts CTRL+K, CTRL+X802

Then choose the appropriate category and then the appropriate template to insert it in to your query window.


Hopefully, you liked this tips. Please stay tuned to learn few more exciting tips in this series. Will love to hear from you. Thanks for reading 🙂


Tip-2: Exciting SSMS features derived from Visual Studio


In this series of posts, we’ll see few great yet less known and under utilized tips/features those are there since earlier versions of Visual Studio and later made their way to SSMS (SQL Server Management Studio). I am sure, you’ll love these tips.


Tip 1: Clipboard Ring – Copy Paste rediscovered
Tip 2: Box Selection – Select and Edit text easily

90
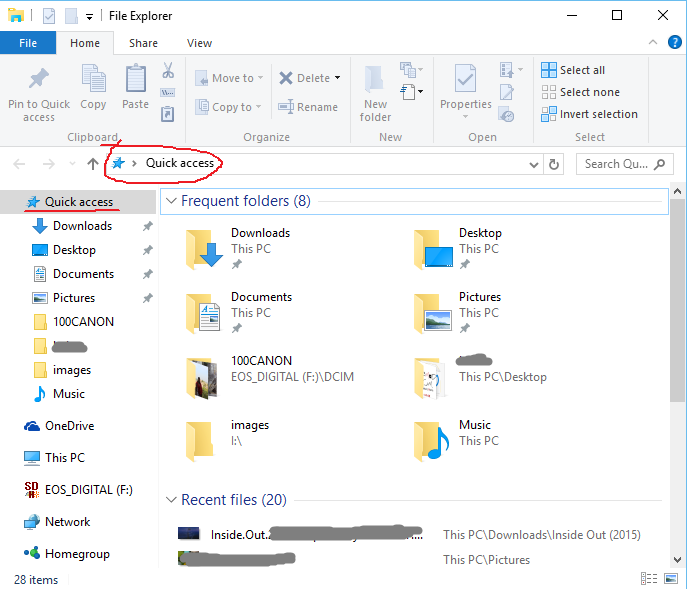
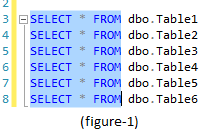
Have you ever imagined to select a particular portion of the text or rectangular region of the text from multiple rows like the figure -1 ?
Box selection?
Why I need that ? Oh ! Believe me, many times while executing queries for various tests you’ll need it.

Is this really possible?
Sad, with traditional horizontal selection system you can’t do that.

If you are known to Visual Studio 2010 (release: 12 April 2010) or newer environment, probably you already know this. Since Eclipse 3.5 (release: 24 June 2009), this facility is there. If you have SQL Server 2014 (not sure about SQL Server 2012), you have the power to do columnar selection also known as box selection.

box-selectionYou can do it either way-

  • Holding down the ALT key and dragging mouse to select text as we do for normal selection.
  • Using keyboard shortcuts ALT + SHIFT + ARROW KEYS

You can do following actions through Box Selection

  • Copy : Copy rectangular region/box of text
  • Text Insertion: Select the box and start typing to replace the selection with typed in new text on every selected line.
  • Paste:
    • Single Copy – Box Paste: On box selection pasting some text will be applied to every line
    • Box Copy – Box Paste: Paste contents of one box selection to another box selection
    • Box Copy – Single Paste: Little weird though. Check what is happening !
  • Zero-Length boxes: Vertical selection of zero characters wide to create a multi-line insertion point for new or copied text. To do this, just hold down the ALT key and keep pressing down/up key till the length you want.  This will create a multi-line insertion point.


Hopefully, you liked this tips. Please stay tuned to learn few more exciting tips in this series. Will love to hear from you. Thanks for reading 🙂


Tip-1: Exciting SSMS features derived from Visual Studio


In this series of posts, we’ll see few great yet less known and under utilized tips/features those are there since earlier versions of Visual Studio and later made their way to SSMS (SQL Server Management Studio). I am sure, you’ll love these tips.


Tip 1: Clipboard Ring – Copy Paste rediscovered

How many times it has happened that you have copied some text and before pasting it on the desired position /location, copied another chunk of text and then you realized that you lost the previous copy?
Have you ever wished for a feature which can help you accessing text previously copied to clipboard and which should be as simple as the popular copy paste shortcuts?

If you are using Visual Studio 2010 or newer, probably you already know this. Since SSMS 2012, this feature know as “Clipboard Ring” has been introduced. Either of the following two simple keyboard shortcuts will do the job.

CTRL + SHIFT + V
CTRL + SHIFT + INS

Using these shortcuts you can cycle through the clipboard ring which stores maximum of 20 copy actions.

Hopefully, you liked this tips. Please stay tuned to learn few more exciting tips in this series. Will love to hear from you. Thanks for reading 🙂


Book: Visual Studio 2013 and .Net 4.5 Expert Cookbook


Let’s start with a very short story. Oh ! It’s about you. You bought a latest mobile phone from the market that you haven’t used earlier. Excited to use it. Did some phone calls and text messages. What’s so exciting about it? After all, every mobile phone is supposed to provide those basic functionality. What else? How to learn other features? Yes, you need a guide or references or help manual.

Earlier this month, I got installed Visual Studio 2013 in my laptop and found this particular book to be my true guide in application development and learning new features introduced with Visual Studio 2013 & .Net framework 4.5. It has uncovered many exciting and time saving new features of VS 2013.

News: You can download Visual Studio 2013 Community Edition for free [from here]

The book is authored by Abhishek Sur, a Microsoft MVP since last 4 years who is also a renowned public speaker and also the author of book Visual Studio 2012 and .NET 4.5 expert Development Cookbook. You can purchase the book from Packtpub or Amazon.in . You can even view few pages for free [here] .

If you want to be more productive and upgraded to the changes in .Net 4.5 & VS 2013 then this is just that perfect book you are looking for.


With the first chapter the book teaches, how to debug better with your new IDE. You’ll find a great in-depth analysis of each features. Debugging is a very essential part of Application Development and one can definitely use these tips to sharpen their debugging skill.
For Example, I was unknown about
“The debugger stores the information of the line number and source code file inside the DB file (known as the program database)

Second chapter is about the Enhancements to WCF. It also teaches to write RESTful services with WCF with few simple and excellent examples. There is a separate chapter on developing Windows Phone 8 apps . Again there is also a separate chapter on “Extending the Visual Studio IDE” which teaches procedure to extend the IDE by applying your changes. From other chapters, you can learn about TFS enhancements, Testing using VS2013, Windows Azure with in-depth analysis and suitable examples.

It was a very good learning experience for me and if you are a passionate .Net developer who loves to learn more then my recommendation is to get it quickly.

Thanks !